

A good home assistant dashboard template is essentially a pre-built layout for your smart home's control panel. It saves you countless hours of setup, giving you a functional and great-looking interface right out of the box. Instead of staring at a blank screen wondering where to begin, you start with an organized structure ready for your own devices.
From Smart Home Chaos To Centralized Control
If your smart home journey was anything like mine, it probably started with a single smart bulb or plug. Then came another, and another. Pretty soon, you're juggling a dozen different apps just to manage everything—one for the lights, another for the thermostat, and a separate one for security cameras.
This constant app-hopping is a real headache. It turns the convenience of a smart home into a frustrating scramble to find the right button. What starts as a dream of a unified, automated home quickly descends into digital chaos.
This is a problem I, yoyoKnows, know all too well from my own smart home automation journey. My own setup used to be a mess of disconnected apps and controls. The answer wasn't adding more gadgets; it was creating a central command center. That's exactly what a well-thought-out Home Assistant dashboard provides. It brings every switch, sensor, and automation together into one clean, easy-to-navigate screen. For my own home assistant setup, I rely on Dashable to create these amazing dashboards.
The Power of a Great Template
Think of a home assistant dashboard template as the architectural blueprint for your digital home. It lays out the foundation, defining the style, structure, and flow of your interface. You don't have to spend weeks wrestling with code or painstakingly arranging every single element from scratch.
A solid template handles all the heavy lifting, freeing you up to focus on what really matters: making it your own.
This isn't just about making things look pretty, either. It’s about making your smart home genuinely usable for everyone living there. When the layout is clear and intuitive, your family won't need a training session just to turn on the living room lights.
A dashboard isn't merely a remote control; it's the heart of your home's intelligence. It transforms raw data from your devices into actionable insights and simple controls, making your home work for you, not the other way around.
Making Customization Accessible
Not long ago, building a truly custom dashboard required some serious technical chops. Thankfully, modern tools have completely changed the game. I personally use Dashable to build and manage my dashboards because it removes the coding barrier. It gives you a visual way to pick, tweak, and deploy beautiful templates without writing a single line of code, which is a game-changer for smart home automation.
This explosion of user-friendly tools has happened alongside Home Assistant's own incredible growth. In fact, as of April 2025, the platform's user base had doubled to 2 million households worldwide, showing just how massive the demand for personalized smart home control has become. You can read more about it on Home Assistant's official blog.
This shift makes one thing clear: a beautiful, functional dashboard is no longer a luxury reserved for developers. It's now an achievable goal for any smart home enthusiast, especially with platforms like Dashable leading the way.
What Is A Home Assistant Dashboard Template?
Think about building a house for a moment. You could grab a pile of lumber and start nailing boards together, figuring it all out as you go. Or, you could start with a professionally designed blueprint that already has the layout, wiring, and plumbing all mapped out.
A Home Assistant dashboard template is that blueprint for your smart home's control panel.
Instead of facing an empty screen and painstakingly adding every single button and sensor one by one, a template gives you a complete, beautifully designed dashboard right out of the box. All you have to do is connect your own "furniture"—your lights, thermostats, and speakers—to the pre-made spots.
This simple shift in approach saves an incredible amount of time and eliminates the frustration of trying to get everything to look just right. You're starting with something that already works and looks great, not building from zero.
The Core Components of a Template
Under the hood, a dashboard template is mostly a collection of YAML code that tells Home Assistant how to arrange everything. But don't let that scare you. The whole point of a good template is that you almost never have to look at the code. It handles the heavy lifting for you.
Every template is built on three key pillars:
- Layout: This is the foundational grid that organizes your entire dashboard. It dictates the number of columns, how different sections are arranged, and ensures everything looks good on a phone, tablet, or computer monitor.
- Cards: Think of these as the individual widgets that show you information and give you control. A solid template comes with a full set of pre-configured cards for things like weather, media players, and lighting scenes, all styled to match.
- Theme: This is what gives the dashboard its personality. The theme handles all the visual details—the color palette, fonts, icons, and background images—to make sure every element feels like it belongs together.
When you put these three pieces together, you get a fully functional, ready-to-use interface. Your only job is to tell the template which of your devices goes where, a process that tools like Dashable have made incredibly straightforward.
This image really drives home the practical benefits of going with a template, highlighting huge savings in time and a big boost in user satisfaction.
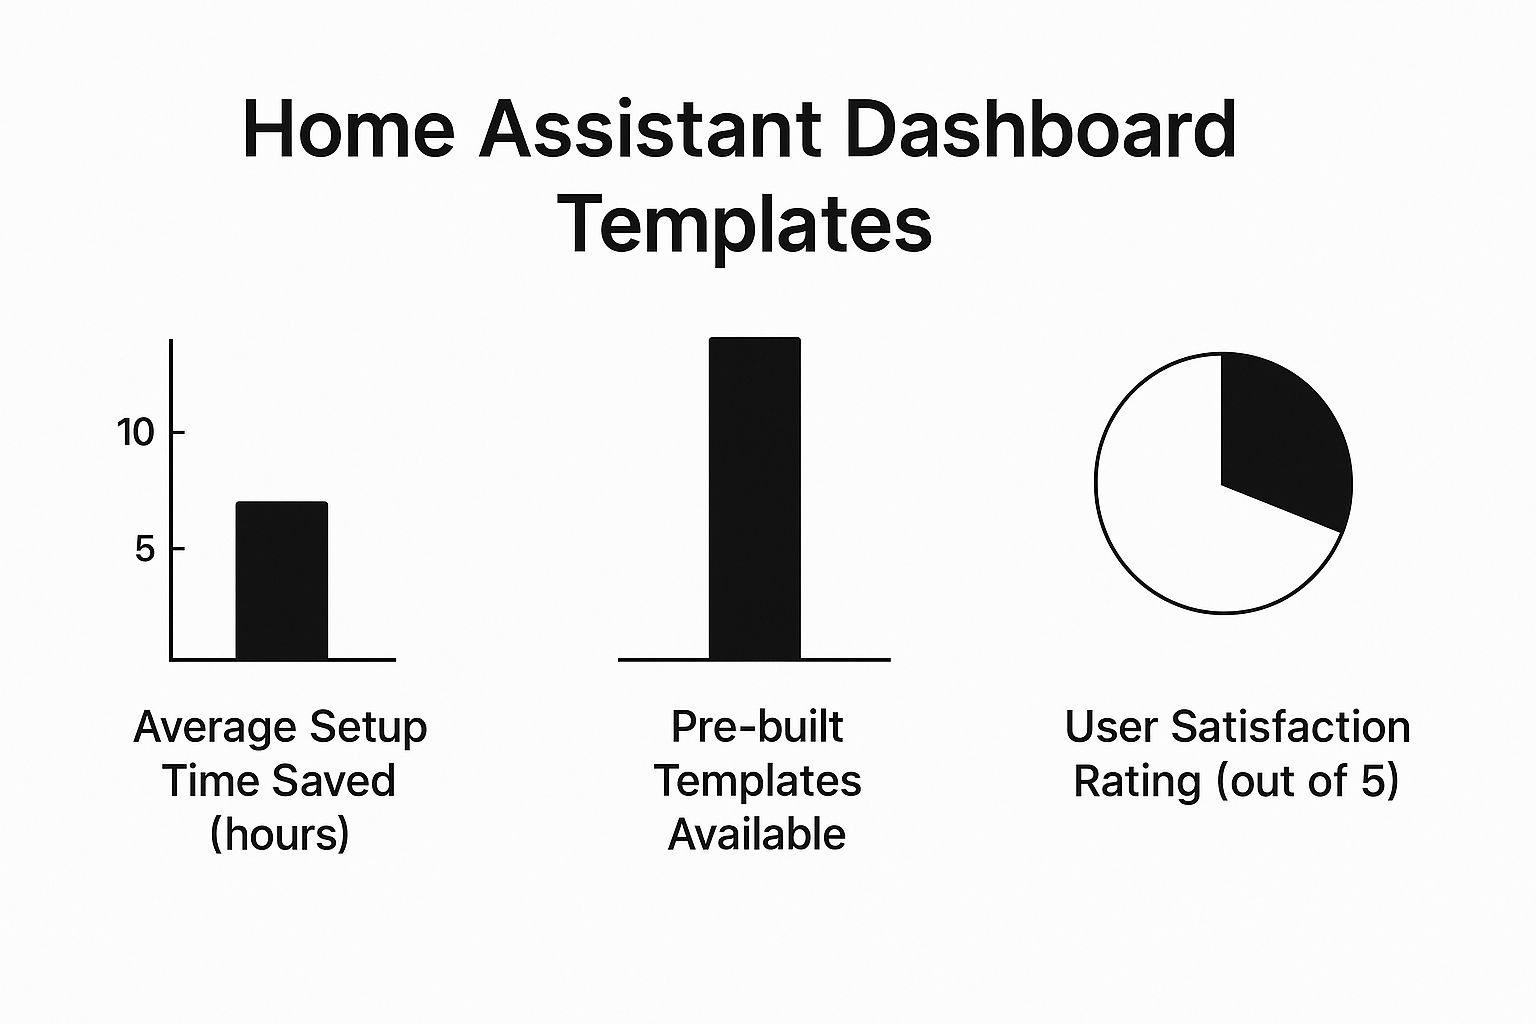
The numbers don't lie. Templates give you a massive head start, often saving dozens of hours while delivering a much more polished and enjoyable result.
Dashboard Approaches Compared: Default vs Custom vs Template
To really see why templates are such a game-changer, it helps to put them side-by-side with the other ways you can build a Home Assistant dashboard. Each path offers a different trade-off between effort, flexibility, and the final look.
Here's a quick comparison of the three main approaches to creating a dashboard.
| Feature | Default Dashboard | Custom from Scratch | Template-Based Dashboard |
|---|---|---|---|
| Setup Time | Instant | 20-50+ hours | 1-3 hours |
| Skill Required | None | High (YAML, CSS, Jinja) | Low to None (with tools) |
| Visual Appeal | Basic & Functional | Unlimited (you are the designer) | Professional & Cohesive |
| Best For | New users just getting started | Experts who want total control | Users who want a great look fast |
The default dashboard gets the job done but won't win any design awards. Building from scratch gives you ultimate power, but it's a huge commitment of time and requires serious technical chops.
A template-based approach hits that perfect sweet spot. It delivers the polish and functionality of a fully custom design without the headache and long hours, especially when you use a visual editor like Dashable.
In the end, templates make great design accessible to everyone. You don't need to be a coder or a graphic designer to have a smart home dashboard that’s both powerful and genuinely a pleasure to use. You get a result that looks like it was built by a professional because, in a way, it was. You’re just building on their expert foundation.
Why A Polished Dashboard Transforms Your Smart Home
A great home assistant dashboard template does way more than just tidy up your smart device controls. It fundamentally changes how you live in and interact with your home. It’s the crucial step that elevates a pile of smart gadgets into a truly intuitive, automated environment. The benefits ripple out far beyond just looking good.
Think of it as transforming a clunky list of toggles into a control center that feels like a natural part of your house. It’s all about making complex technology simple and enjoyable for everyone under your roof.
Boosted Usability For The Whole Family
Let's be honest, the default Home Assistant interface is powerful, but it can look like a spaceship cockpit to family members who aren't tech-savvy. A well-designed template completely fixes this problem by prioritizing intuitive design.
It cleverly groups related controls, uses icons that make sense at a glance, and creates logical flows. Suddenly, anyone can adjust the thermostat or check the front door camera without needing a 10-minute tutorial. That’s when a smart home actually feels smart—when everyone living there can use it effortlessly.
Massive Time Savings During Setup
Building a beautiful and functional dashboard from scratch is a huge undertaking. I’m talking about countless hours spent planning layouts, wrestling with YAML code, and tweaking every little detail. A good template lets you skip 90% of that grind.
You get to start with a solid, pre-built foundation, freeing you up to focus on the fun part: customization. As a long-time creator (yoyoKnows), I can tell you this is an absolute game-changer. Using a platform like Dashable, I can get a complete, professional-looking dashboard up and running in a tiny fraction of the time it used to take me to code one by hand.
A dashboard template isn't just about saving time on day one. It’s about building on a reliable, community-tested foundation that can grow with your smart home, instead of constantly reinventing the wheel.
This efficiency lets you spend less time managing your smart home and more time actually enjoying it. You get to that final, polished result faster than ever before.
Consistency Across All Your Devices
We control our homes from all sorts of screens these days—a phone when we're out, a tablet on the coffee table, a dedicated wall panel. One of the best things about a well-designed template is its built-in responsiveness.
This means your dashboard looks and works perfectly, no matter the screen size. All the buttons, charts, and controls automatically rearrange themselves to fit the device you're using. You get a consistent, reliable experience everywhere without having to design separate layouts for your phone and tablet. The template does the heavy lifting for you.
Community-Driven Innovation
Finally, when you use a popular template, you’re plugging into the collective brainpower of the entire Home Assistant community. These designs aren't just built by one person in a bubble; they are constantly tested, tweaked, and improved by thousands of real-world users.
This collaborative spirit is what drives incredible innovation. By using a community-vetted template, you benefit from:
- Creative Designs: Discover layouts and clever ideas you'd never think of on your own.
- Best Practices: Automatically use proven methods for organizing information and controls.
- Continuous Improvement: Get access to ongoing updates, new features, and bug fixes from the creators.
Platforms like Dashable are fantastic because they curate the very best of these community-driven designs, making it incredibly easy to find and implement a world-class dashboard without all the usual headaches.
How To Find The Perfect Dashboard Template
So, you're ready to ditch the default look and find a home assistant dashboard template that actually feels like your smart home? Perfect. The good news is that finding the right blueprint is easier than you think, as long as you know where to look and what to look for.
Think of it like picking a new theme for your phone. You're not just hunting for something that looks cool. You need it to be functional, well-supported, and play nicely with all your apps. The same logic applies here.
The Old-School Way of Finding Templates
For a long time, the only way to get a great template was to roll up your sleeves and dive into the massive Home Assistant community. It can be a rewarding DIY project, but it definitely takes some patience.
The two main spots were, and still are:
- Home Assistant Community Forums: This is where passionate creators often post their latest and greatest designs. You can find some amazing inspiration, but you'll also have to dig through countless forum posts to find a complete, well-documented template.
- GitHub: Many developers keep their template code on GitHub. It's a goldmine for tech-savvy users, but it can feel pretty intimidating if you’re not used to navigating code repositories and technical docs.
When you're sifting through these places, you're basically a prospector looking for gold. You have to keep an eye out for clues of a quality find, like recent updates, happy user comments, and clear setup instructions.
A Simpler, More Modern Approach
While the community forums are the heart of Home Assistant, I'll be honest—hunting for the perfect template there can feel a bit scattered. It takes time. That’s why I, yoyoKnows, have personally moved to a more direct method. Tools like Dashable have completely changed the game.
Instead of you spending hours searching, Dashable brings the best templates right to your fingertips in a curated library. It’s like having an expert pre-screen every single option for you.
A platform like Dashable isn't just a list of templates. It's a hand-picked collection of high-quality designs that are guaranteed to work and are easy to set up. This completely removes the guesswork and the risk of picking a template that's been abandoned or is full of bugs.
This approach saves a massive amount of time and guarantees that whatever you choose is built on a solid foundation. That way, you can focus on the fun part: making it your own. For a deeper dive into what makes a dashboard truly stand out, check out my complete guide on the best home assistant dashboard options out there today.
Your Template Evaluation Checklist
Whether you find a template on a forum or through a service like Dashable, you should always run it through a quick quality check. A great template is more than just a pretty face; it has to be practical and reliable.
Here’s a simple checklist to keep in mind:
- Active Maintenance: Is the creator still updating it? An active project means bugs get fixed and it will keep working with new Home Assistant versions.
- Good Documentation: Are the setup instructions clear? Good documentation is the difference between a 30-minute setup and a weekend of hair-pulling frustration.
- Required Integrations: Does the template need custom components from HACS (Home Assistant Community Store)? Make sure you're okay with installing whatever it depends on.
- Device Compatibility: Does the design fit the kind of devices you use most? A media-focused template might not be a great fit if your setup is all about security sensors.
The dashboard scene in 2025 has also seen some major improvements in how templates are built. One big one is the Streamline Card plugin, an all-in-one engine that makes it much easier to create reusable and dynamic dashboard elements. It's a huge step up from older tools. Following this checklist ensures you end up with a dashboard that isn't just beautiful, but also stable and ready for the future.
Step-By-Step Guide To Implementing Your Template
Alright, let's get to the fun part—turning that perfect home assistant dashboard template you found into your smart home's new command center. This is where the blueprint becomes reality. If you've ever tried building a dashboard before, you probably remember the headache of copying and pasting endless lines of YAML code, crossing your fingers, and hoping it all worked.
Those days are over.
As the guy behind yoyoKnows, I’ve sunk countless hours into building dashboards from the ground up. I can tell you firsthand that using a platform like Dashable completely changes the game. We'll walk through this process together, and I'll show you exactly how simple it can be to get a professional-looking dashboard up and running in minutes, not days.
You can go from a blank canvas to a fully functional interface without ever touching a single line of code.
Step 1: Browse And Select Your Template
First things first: picking your design. Instead of spending hours digging through forums, a curated platform brings the best designs right to you. In a tool like Dashable, the library is packed with high-quality, pre-vetted templates from top community creators.
You can filter by style (think minimalist, techy, or family-friendly) or by what you need it to do (media controls, security, energy monitoring). Every template comes with a live preview, so you can see exactly how it looks and feels before you commit. It completely takes the guesswork out of the process, ensuring you start with a foundation you genuinely love.
Don't rush this step. A great template doesn't just look good—it aligns perfectly with how you actually want to interact with your home.
Step 2: Visually Map Your Devices
This is where the magic really happens, and it's the step that used to be a massive roadblock for so many people. Traditionally, you'd have to hunt down the entity_id for every light, switch, and sensor in your Home Assistant. Then, you'd have to painstakingly plug each one into the right spot in the YAML code. One tiny typo could break the whole thing.
Thankfully, that’s ancient history now. A visual interface changes everything.
Dashable plugs directly into your Home Assistant instance and fetches a complete list of all your devices. The template will have placeholders like "Living Room Lamp" or "Main Thermostat," and all you have to do is use a dropdown menu to assign your actual device to that spot. It’s like a simple matching game.
This approach transforms a tedious coding job into a quick point-and-click setup. It’s not just easier; it’s practically error-proof. You can’t make a syntax mistake when you’re just picking from a list.
The image below gives you a clear idea of how clean and straightforward this device mapping process is.
As you can see, the interface is all about assigning your entities to pre-defined slots. It makes the entire setup process fast and intuitive.
Step 3: Customize Colors, Icons, And Layout
Once your devices are all hooked up, it’s time to make it yours. A great template is just a starting point; the real magic comes from tweaking it to perfectly match your home's vibe and your personal taste.
This is another area where visual editors are a huge win. You don't need to know a lick of CSS or remember hex codes to make powerful changes.
You can typically customize:
- Color Palette: Need a dark mode for that wall-mounted tablet? Or maybe you want the accent colors to match your living room decor? Most modern tools have simple color pickers that let you change the entire theme in seconds.
- Icons: Swap out the default icons for ones that better represent your devices. It’s a small change that makes a huge difference in how quickly you can find what you're looking for.
- Card Layout: Don't like where the weather card is? Just drag it somewhere else. You can rearrange, add, or remove cards to build the exact layout that works for you.
The ability to fine-tune your dashboard without writing code is what turns a generic template into a truly personal control panel. It should feel like it was designed just for you.
Getting your dashboards placed correctly on different devices is also a huge part of a great user experience. If you want to dive deeper, you can read my thoughts on perfectly positioned dashboards for home automation.
Step 4: Deploy With A Single Click
You’ve picked your template, mapped your devices, and customized the look. The final step is pushing it all live to your Home Assistant instance.
In the past, this meant manually creating a new dashboard file, pasting in all your code, and then restarting Home Assistant. Now, it’s as simple as hitting a button that says "Deploy" or "Publish."
Tools like Dashable handle all the messy backend stuff for you. It automatically creates the necessary files and configurations inside your Home Assistant setup, and your new dashboard appears instantly. It’s ready to use on all your devices. This one-click deployment removes that last technical hurdle, making the entire journey from start to finish feel effortless.
Advanced Dashboard Customization Techniques
Once you've got a solid home assistant dashboard template set up, the real fun begins. This is where you move beyond simple, static displays and start making your dashboard an intelligent, responsive part of your home. It’s all about making your interface react to what's happening in the real world.
Think about it: wouldn't it be great if your dashboard only showed a "Garage Door Open" warning when the door is actually open? That's the magic of conditional cards. These are widgets that appear or disappear based on a device's state, cutting through the clutter to show you only what needs your attention right now.
Then there are custom cards from the community. These are a complete game-changer, taking you way beyond standard toggles and sliders. We're talking interactive floorplans, detailed energy usage graphs, or custom pop-ups for specific actions. This is how you build a dashboard that is genuinely powerful and uniquely yours.
Making Advanced Changes Safely
Now, while these advanced features are powered by YAML behind the scenes, you don't need to be a coding wizard to use them. In fact, I'd argue against diving into the raw code directly. A single misplaced comma or space can break your entire dashboard, leading to hours of frustration. A good tool provides a crucial safety net.
As yoyoKnows, I personally use Dashable for all these kinds of modifications. It offers a visual way to apply conditional logic and add custom elements without ever touching the raw YAML files myself. This approach not only prevents common mistakes but makes these powerful features accessible to everyone, not just developers.
The point of advanced customization isn't to make things more complicated. It's about creating an intelligent interface that anticipates your needs, showing you the right information at the right time, without overwhelming you.
This move toward more dynamic interfaces is a huge step forward for smart home control. By 2025, Home Assistant dashboards have evolved so much, with features like sections and specialized cards making customization easier and more powerful than ever. It's why so many advanced users now build their own dashboards from the ground up—the default "Overview" just doesn't cut it anymore. You can see great examples of this in modern Home Assistant dashboard guides.
Integrating Real-Time Sensor Data
A truly smart dashboard feels alive, and that comes from pulling in real-time information from your home's sensors. Weaving this data directly into your interface is one of the best ways to make it genuinely useful.
You can easily create cards that display:
- Live temperature and humidity readings for every room.
- Motion sensor status to see which areas of your home are active.
- Door and window sensor states for at-a-glance peace of mind.
Of course, how you present this information is just as important as having it. You might use simple badges for a quick status check or detailed graphs to see how things change over time. Even small details like fonts can make a big difference in how readable your dashboard is. If you're looking to personalize the look and feel, check out our guide on adding custom fonts to your Home Assistant dashboard.
A tool like Dashable makes this a breeze. You can just drag and drop sensor data into your layout and pick how you want it displayed. This is how your dashboard transforms from a simple remote control into a true, live snapshot of what's happening in your home.
Got Questions About Dashboard Templates? We've Got Answers.
Jumping into the world of home assistant dashboard templates is exciting, but it's totally normal to have a few questions before you get started. Let's walk through some of the big ones so you can feel confident moving forward.
Do I Have to Be a Coder to Use These?
Not at all. This is probably the biggest misconception out there. While templates are built on code, you don't need to touch a single line of it.
Modern platforms like Dashable are designed to be completely visual. You simply pick a template you like and use their intuitive interface to map your smart devices to the right controls. It's all clicks, no code.
Will a Fancy Template Bog Down My System?
It's a valid concern—can your Home Assistant server handle a complex, high-end dashboard? A poorly made template with tons of elements constantly pulling data could indeed cause a slowdown.
But that’s where using a curated source really pays off.
The best templates are designed for performance from the ground up. When you use a managed platform, you're getting access to dashboards that have already been vetted for efficiency. For example, every template available in the Dashable library is tested to make sure it's not just beautiful, but also lightweight.
This gives you the best of both worlds: a stunning interface without sacrificing the speed and responsiveness of your smart home.
What Happens if a Home Assistant Update Breaks My Dashboard?
Ah, the classic smart home nightmare. An update rolls out, and suddenly your perfectly crafted dashboard is a mess of errors.
If you're manually managing your dashboard by copying and pasting code from places like GitHub or community forums, then yes, you're on the hook for fixing it. This often means digging through forums to find a solution or waiting for the original creator to post a patch.
Using a service like Dashable completely sidesteps this problem. Their team takes on the responsibility of keeping every template in their library compatible with the latest Home Assistant releases. When an update happens, they handle the necessary tweaks behind the scenes, so your dashboard just keeps working. It's a massive time-saver that eliminates one of the biggest headaches of DIY smart home management.
Ready to stop wrestling with code and start building a beautiful smart home dashboard in minutes? Dashable offers a curated library of stunning templates and a visual editor that makes customization simple. Transform your Home Assistant experience today at Dashable.


