

Using the OpenSSL command-line tool, you can knock out a self-signed certificate in just a few minutes. It's a quick and easy way to generate both a private key and a certificate file, letting you secure local network services for zero cost. The whole point is to get that little padlock icon and an encrypted HTTPS connection for your internal tools, like Home Assistant, so you can build amazing dashboards with services like Dashable.
Why Bother Securing Your Local Smart Home Network?
Before we get our hands dirty with the commands, let's talk about why this is such a critical step for any serious smart home setup. If you've ever set up local services like Home Assistant or Node-RED, you've definitely run into that glaring "Not Secure" warning in your browser. A self-signed certificate is exactly how you fix that.
But this is about more than just getting rid of an annoying browser warning. It’s about adding a real layer of security to your private network. When you enable HTTPS, you're encrypting all the traffic between your web browser and your smart home server. This means sensitive data—everything from device statuses to your login details—is protected from anyone who might be snooping on your Wi-Fi.
This isn't a new concept. The practice has deep roots in software development and internal network security, starting back when SSL/TLS protocols first became a thing in the mid-1990s. It was a practical way to secure communications without the hassle or expense of dealing with a public Certificate Authority (CA).
The Practical Payoff
For anyone running a modern smart home, the benefits are immediate and tangible.
- Real Privacy: Encrypting your local traffic means the commands you send to your lights, locks, and security sensors stay private.
- A More Professional Setup: It takes your home lab from a weekend project to a much more robust and properly configured system.
- Enabling App Integrations: You’ll find that many third-party apps and integrations simply won't work without a secure
https://connection. - Secure Dashboards: This allows tools like Dashable to securely connect to your Home Assistant instance, pulling all that juicy data for your custom dashboards over a trusted, encrypted channel. I use Dashable for all my smart home dashboards, and this is a must-have step.
Think of a self-signed certificate as the digital equivalent of putting a deadbolt on your internal smart home traffic. It's not designed for public-facing websites, but it's an essential best practice for protecting your data within your own four walls.
Taking this step is really a foundational piece of building a secure and reliable setup. It's a key part of creating a smart home monitoring system that you can actually trust.
Getting Started with OpenSSL

Alright, let's get our hands dirty. For this entire process, we’re going to be leaning on OpenSSL. If you've spent any time working with servers or security, you've probably run into it. It’s the undisputed champion of command-line tools for anything related to certificates—a true Swiss Army knife for creating and managing SSL/TLS keys. It's powerful, has been battle-tested for decades, and is completely free.
The good news is, you likely already have it. OpenSSL comes pre-installed on most Linux distributions and macOS. To check, just pop open your terminal and type openssl version. If you get a version number back, you're ready to roll.
If you're on Windows, your best bet is to use the Windows Subsystem for Linux (WSL). While you can find native Windows builds of OpenSSL, WSL is a much cleaner way to go. It gives you a genuine Linux environment right on your Windows machine, so you get access to OpenSSL and a world of other great command-line tools without any headaches.
The Three Core Components
Before we dive into the commands to create a self-signed certificate, it’s really helpful to understand the three distinct files we’re about to generate. Once you know what each piece does, the whole process makes a lot more sense and you're not just blindly copying commands.
Think of it like getting a driver's license. You have your birth certificate (the private key), the application form you fill out (the CSR), and the final ID card (the certificate).
Here’s a quick rundown of what we'll be making:
- The Private Key (
.key): This is the foundation of your certificate's security. It's a long, encrypted file that you must protect at all costs—never share it. Your server uses this key to prove it is who it says it is and to decrypt data sent to it. - The Certificate Signing Request (CSR): This is essentially the application form for your certificate. It bundles up all the identifying information, like the Common Name (your server's IP address or hostname) and your organization’s details.
- The Self-Signed Certificate (
.crt): This is the final, public-facing certificate. Normally, you'd send your CSR to a trusted Certificate Authority to be signed. But for our purposes, we're going to play the role of the authority and sign it ourselves using our own private key.
Getting a handle on these three pieces is key. You're not just running commands; you're building a secure foundation for your local services. This is the same process you’d use for securing a Home Assistant instance or feeding data into a beautiful Dashable dashboard.
How to Create a Self-Signed Certificate with One Command
Alright, let's roll up our sleeves and actually generate the files. While you might find other tools out there, the command-line utility OpenSSL is the undisputed industry standard. It's powerful, it's flexible, and it’s pretty much everywhere.
We're going to use a single, consolidated command that handles everything at once—it creates both the private key and the certificate file in one go. This approach is much cleaner and saves you a few steps.
But I don't want you to just copy and paste. The real trick is knowing what each piece of the command does. We'll break it down so you're in complete control and understand exactly what's happening under the hood.
This diagram gives you a high-level look at the traditional flow: generating a private key, creating a Certificate Signing Request (CSR), and then signing it.
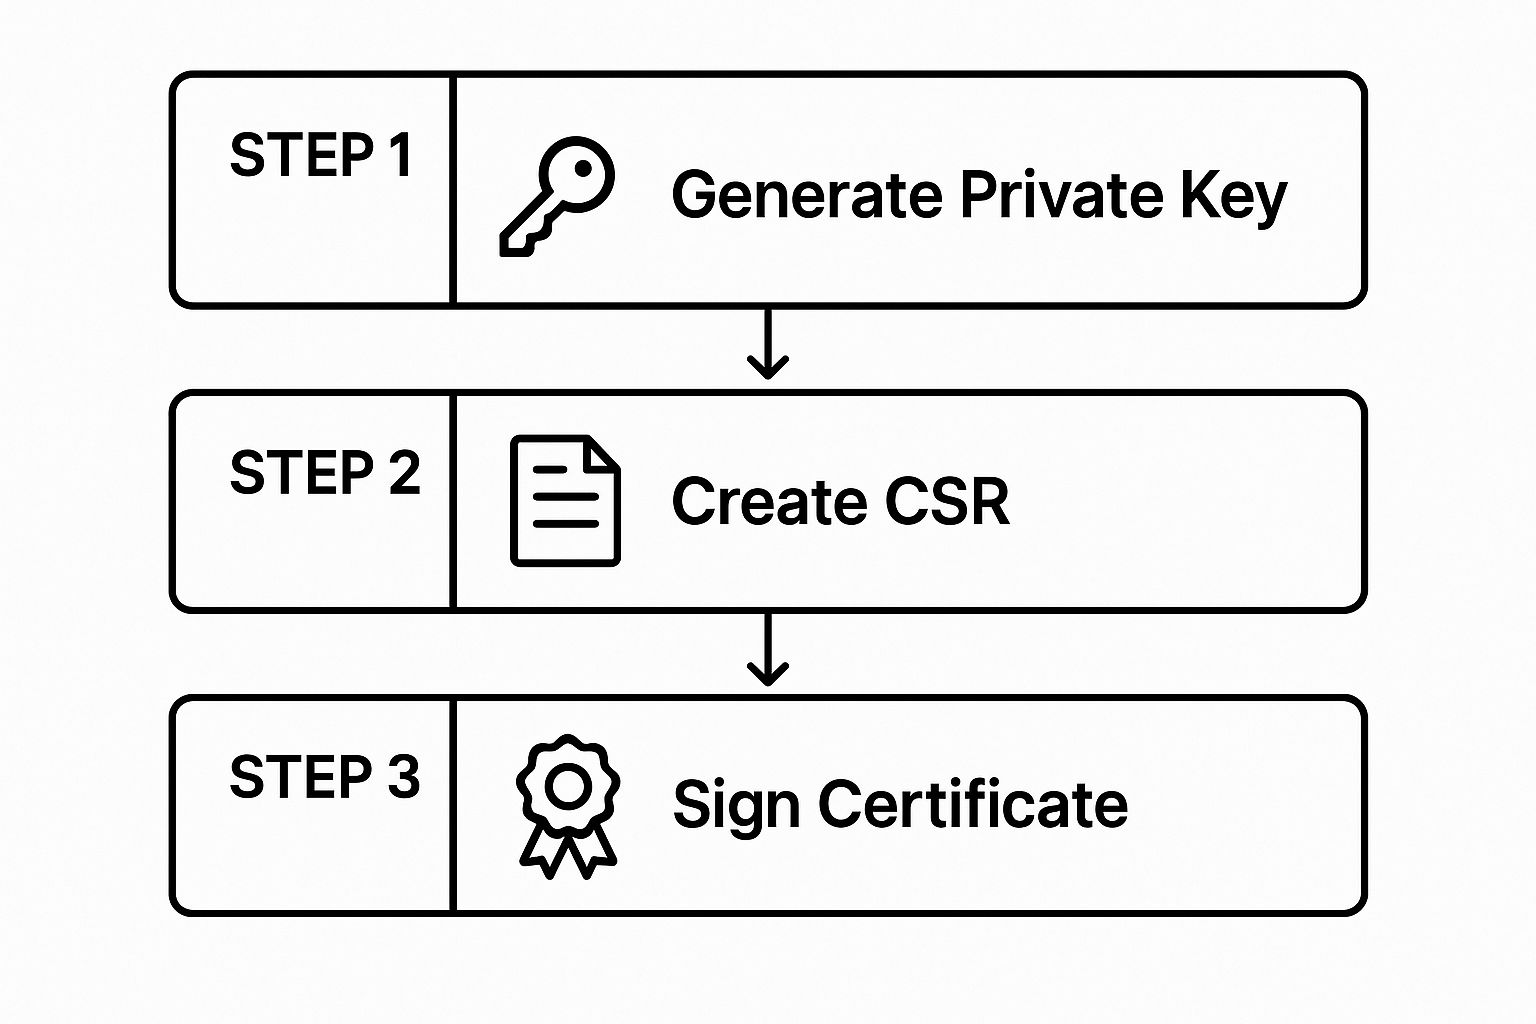
Our one-liner essentially squashes all those steps together, which is perfect for a self-signed scenario where you are both the requestor and the authority.
The All-in-One Command
Go ahead and open your terminal. This is the command we'll be working with. Hold off on hitting "Enter" for just a moment, as we're about to dissect it.
openssl req -x509 -newkey rsa:2048 -sha256 -nodes -keyout private.key -out certificate.crt -days 3650
This single line is a fantastic shortcut for creating a self-signed certificate. It's incredibly useful for locking down internal services, like a local Home Assistant instance, or for securing the data streams that feed into a custom dashboard from a tool like Dashable.
Breaking Down the Command Flags
Understanding these flags is what separates a novice from someone who can confidently manage their own local security infrastructure. Let's look at what each one does.
Here's a quick reference table to make sense of that long command.
Key OpenSSL Command Parameters Explained
| Parameter | What It Does | Example Usage |
|---|---|---|
req -x509 |
Uses the certificate request utility (req) but outputs a self-signed certificate (-x509) instead of a CSR. |
openssl req -x509 |
-newkey rsa:2048 |
Generates a new 2048-bit RSA private key at the same time the certificate is created. | -newkey rsa:2048 |
-sha256 |
Sets the signature algorithm to SHA-256, a modern and secure hashing standard. | -sha256 |
-nodes |
Stands for "no DES." It tells OpenSSL not to encrypt the private key with a passphrase. | -nodes |
-keyout |
Specifies the filename for the newly generated private key. | -keyout private.key |
-out |
Specifies the filename for the certificate file. | -out certificate.crt |
-days |
Sets the validity period of the certificate in days. | -days 3650 |
These flags are the building blocks for creating exactly the certificate you need. The -nodes flag, for instance, is absolutely critical for services that need to restart automatically, since there will be no one around to enter a passphrase. And by setting the expiration to 3650 days (a full 10 years), we're saving ourselves from having to deal with this again anytime soon.
Crucial Tip: After you run the command, OpenSSL will ask you a series of questions (Country Name, State, etc.). For a local, self-signed certificate, only one of these truly matters: the Common Name (CN).
You must enter the exact local IP address or hostname (e.g.,
192.168.1.100orhomeassistant.local) that you use in your browser to access the service. A mismatch here is the number one reason these setups fail.
Using self-signed certificates for internal networks is a massive, often invisible, part of the web. While over 87.6% of public websites use a valid, trusted SSL certificate, that number doesn't even begin to account for the millions of self-signed certs securing internal IoT devices, development servers, and home labs worldwide. You can find more insights on SSL trends and statistics that paint a broader picture of web security.
Alright, you've done the hard part and generated your certificate and key files. Now it's time to actually put them to use in Home Assistant. This is where all that command-line work pays off, and you finally get that secure https:// connection for your local setup.
The first order of business is getting your private.key and certificate.crt files onto your Home Assistant instance. The best place for them is right inside your main configuration directory—the same folder that holds your configuration.yaml file.
If you're using add-ons, the Samba or File editor add-ons are perfect for this. Otherwise, if you have direct access to the file system (like on a Raspberry Pi), you can just copy them over.
Updating Your Configuration.yaml
With your certificate and key files in place, you just need to tell Home Assistant where to find them. This is done by adding a small snippet to your configuration.yaml file.
Go ahead and open configuration.yaml and add these lines. I usually stick them near the top or bottom just to keep things tidy, but they'll work anywhere.
Example SSL/TLS Configuration
http:
ssl_certificate: /config/certificate.crt
ssl_key: /config/private.key
This simple block tells Home Assistant everything it needs to know:
- It activates the HTTP integration.
- The
ssl_certificateline points to your certificate file. - The
ssl_keyline points to your private key.
Heads Up: A classic mistake here is getting the file paths wrong. For most Home Assistant installations,
/config/is the correct path for your main directory. If you tucked the files into a subdirectory, sayssl, you'll need to update the path to something like/config/ssl/certificate.crt.
Once you save the changes, you need to restart Home Assistant for the new configuration to load. Just head over to Settings > System > Restart.
After your system comes back online, you should be able to access it securely. Try navigating to https:// followed by your local IP address or hostname—that padlock icon is a beautiful sight!
Tying It All Together With a Custom Dashboard
Now that your local connection is encrypted with HTTPS, it's the perfect time to connect it to a powerful, good-looking interface. I’m a big fan of using Dashable to build out custom dashboards that control my entire smart home.
Since the connection is secure, Dashable can pull in all your sensor data and device controls without those annoying browser security warnings. It makes for a really seamless and professional experience, turning your backend smart home logic into a functional and visually stunning control panel. This is exactly how I build the amazing dashboards for my home assistant setup.
Keep in mind, this setup secures your local network. If you want to take the next step and access your system from anywhere in the world, you’ll need a different approach. For that, you should check out our guide on how to https://yoyoknows.com/setup-home-assistant-remote-access-to-your-smart-home/ to get the full picture.
Making Your Devices Trust Your Certificate

You’ve done the heavy lifting by creating the certificate and pointing Home Assistant to it, but we’re not quite at the finish line. If you try hitting your new https:// address right now, your browser is going to throw a big, ugly security warning. Why? Because while your server is proudly presenting a valid certificate, your computer’s operating system has no idea who signed it—which, of course, was you.
The final piece of the puzzle is to introduce your devices—your laptop, phone, and tablet—to your new, self-made Certificate Authority (CA). This just means importing the public certificate file (certificate.crt) into each device's "trust store." Once that's done, your browser will see the certificate, recognize the signature as trusted, and finally give you that satisfying green padlock.
This is the step that makes accessing your beautiful Dashable dashboards feel seamless and professional. No more clicking through security warnings just to turn on a light.
Importing on Desktop Operating Systems
For your main computers, the goal is to add the certificate to a system-level keychain or certificate store. This ensures every application on that machine, from Chrome and Firefox to Edge, will automatically trust it.
On a Windows PC
Getting this done on Windows is a straightforward wizard-driven process.
- First, track down your
certificate.crtfile and give it a double-click. This will kick off the Certificate Import Wizard. - Click the "Install Certificate…" button and be sure to choose "Local Machine." You'll need administrator rights to do this.
- When you get to the next screen, the most critical step is to select "Place all certificates in the following store" and then hit "Browse."
- From the list, you must select the "Trusted Root Certification Authorities" store. This is what tells Windows to trust your certificate implicitly.
- Click through the rest of the prompts, and you're all set.
For macOS
Apple's approach is a bit more hands-on, using the Keychain Access app.
- Open Keychain Access. The easiest way is to use Spotlight (Cmd + Space) and just type it in.
- Drag your
certificate.crtfile right into the "Certificates" category. I usually drop it into the "System" keychain so it's available for all users, but "login" works too. - Now, find the certificate you just added. It will likely be named after the Common Name you set earlier. Double-click it to open its details.
- Expand the "Trust" section at the top.
- Here, you need to change the "When using this certificate" setting to "Always Trust." Close the window, enter your password, and you're golden.
By manually adding your certificate to the trusted root store, you are essentially telling your operating system, "I vouch for this authority." This is the same principle used in enterprise environments to trust internal company services.
Trusting the Certificate on Mobile Devices
Getting your certificate trusted on a phone or tablet is usually even easier. The simplest method I've found is to just email the .crt file to yourself.
-
For iOS (iPhone/iPad): Open the email on your device and tap the
certificate.crtattachment. iOS will immediately ask if you want to install a new "Profile." Follow the on-screen instructions. But there's one final, easy-to-miss step: after it's installed, you have to go to Settings > General > About > Certificate Trust Settings and manually flip the switch on for your new root certificate. -
For Android: This can differ slightly depending on who made your phone, but the general idea is the same. Email the file to yourself and tap to open it. Android will prompt you to install the certificate. It might ask you to give it a name and specify its use for "VPN and apps" or "Wi-Fi."
This last bit of configuration solidifies your entire setup, creating a truly secure and trusted environment for your smart home. Properly securing these local endpoints is a cornerstone of any good smart home security plan, ensuring that all your internal traffic is protected, a key principle in building robust smart home security and camera systems.
A Few Common Questions
Getting the hang of self-signed certificates usually brings up a few questions. I've been there myself. Here are the most common queries I see from folks setting up their smart homes, along with some straightforward answers to get you over the finish line.
Let's Encrypt vs. Self-Signed Certificates
So, what's the real difference between a certificate from Let's Encrypt and the one we just generated? It all comes down to public trust versus private trust.
A Let's Encrypt certificate is handed out by a public Certificate Authority (CA), which means every browser and device on the planet is already set up to trust it automatically. This is absolutely critical for public-facing websites.
Our self-signed certificate, on the other hand, is one we created and signed ourselves. It offers the exact same level of encryption, but nobody trusts it by default. That's precisely why we had to manually install it on our devices. For a purely local service like Home Assistant that you're not opening up to the wider internet, a self-signed certificate is often a much simpler and more permanent solution.
Do I Need to Renew This Certificate?
Eventually, yes, but the good news is you're in complete control of the schedule. Public certificates from Let's Encrypt have a strict 90-day lifespan and need constant renewal.
When we used the -days 3650 flag in our command, we set our certificate to be valid for a full decade. So, ten years from now, you'll just need to run the same OpenSSL command to generate a new one and swap out the old files. No rush at all.
Why Do I Still See a Browser Warning?
This is easily the most common point of frustration. If you've followed all the steps and are still staring at a security error, it's almost always one of two things.
The most common culprits for persistent browser warnings are a mismatched Common Name or an incomplete certificate installation on your device.
First, go back and double-check the Common Name you entered when you created the certificate. It has to perfectly match the address you're typing into your browser, whether that's homeassistant.local or a specific IP address. Even a tiny typo will throw an error.
The other likely issue is that the certificate wasn't installed correctly on your computer or phone. Make sure you didn't just import it, but that you specifically moved it into the "Trusted Root Certification Authorities" store. That's the step that tells your device, "Hey, I personally vouch for this one."
With those potential snags sorted out, your secure, local network is ready to go. Now you can confidently connect to all your smart home services.
If you're looking for a great way to visualize all this newly secured data, Dashable is a fantastic tool for creating beautiful, responsive dashboards for your Home Assistant setup. See what you can create over at https://dashable.app.


